Make Ahead Mashed Potatoes

Mashed Potatoes

How to make mashed potatoes ahead of time.

Mashed potatoes are arguably the most popular side dish for everything from steak to fried chicken to turkey dinner. Everyone loves mashed potatoes! Except the cook. Ask any cook and they will tell you how stressful it is to make the potatoes and get them to the table hot, and the mess it leaves in the wake. However, even with the stress and mess, you still have to make the mashed potatoes. So I went on a mission for make-ahead mashed potatoes.

I tried multiple recipes and techniques. What I discovered is that there are two really great ways to make mashed potatoes in advance.

Both methods require you to first make your favorite mashed potato recipe. If you don’t have a good recipe, try mine below.  

Method One: The Slow Cooker

If you are serving them the same day you make them you can make them up to about 2.5 hours in advance and put them right in the crockpot on “warm” and they will stay wonderfully. Stir occasionally, and if you see them starting to dry out simply add  touch more milk, cream or chicken broth.

If you are making them to serve more than 2 hours in advance, such as one or two days in advance, you can make the complete recipe and store them right in the crock pot, cool, cover them so saran wrap is resting on top of the potatoes to reduce air exposure and then top with the lid. Refrigerate until about 2.5 – 3 hours before serving time. Remove the saran wrap and place crockpot on “low.” Once the potatoes loosen up and become creamy again, stir occasionally. If too dry, just add small amounts of milk, creme or chicken broth until you achieve the consistency you are looking for. They will stay well for up to 3 hours after they are hot. They will stay even longer, but that is the point where I see them start to dry out so I like to keep it under 3.

Method Two: The Double Boiler

When you are making mashed potatoes and only need to make them a few hours in advance rather than a day or so, another great way to keep them hot is to use a double boiler. A double boiler is simply a pot with just enough water in the bottom to almost touch the bottom of the glass bowl you will set inside the pot. Bring the water to a simmer and control your heat to keep the water at a very low simmer. Insert your bowl of potatoes and cover.  This method will keep the potatoes hot for up to two hours, but I like to try and keep it to 1.5 hours or less. Be careful when removing the bowl- it will get very hot!


Pro tips for excellent mashed potatoes:

1. For light, fluffy Mashed Potatoes, use a Ricer.

Potato Ricer

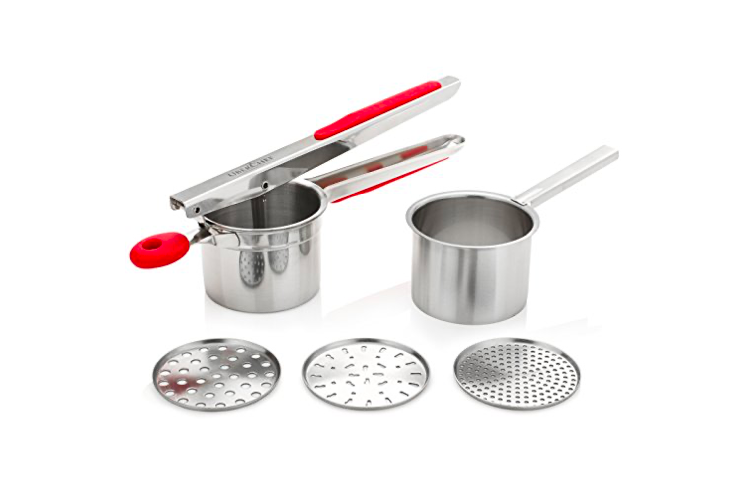
Once I discovered a potato ricer and experienced the results, I stopped with all the other equipment. It’s 100% worth the extra effort. Amazon sells several varieties.

Riced Potatoes

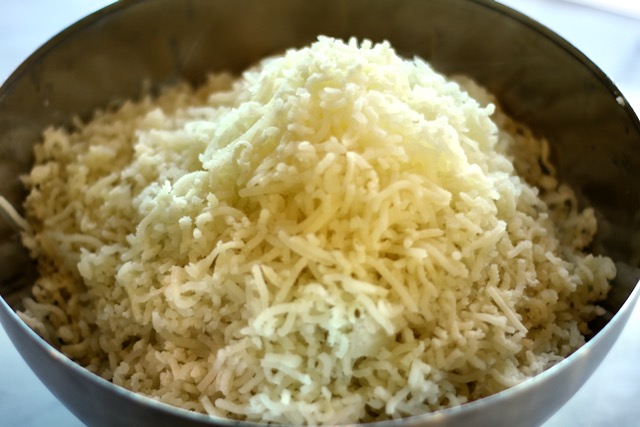
Using a potato ricer to make mashed potatoes will ensure fluffy potatoes. They look like this before adding butter and cream, but blend together for silky, smooth mashed potatoes.

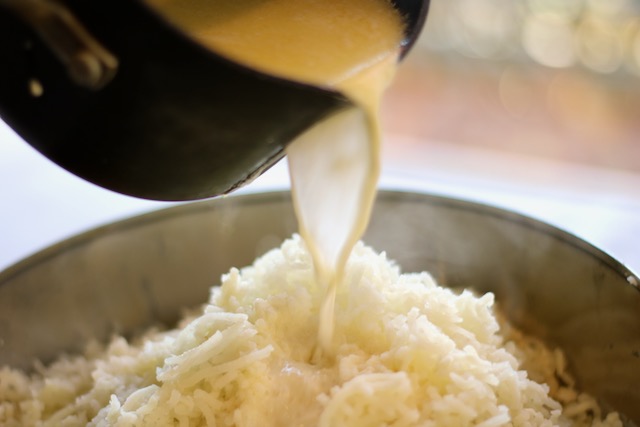
2. Heat Butter and Cream before adding to Potatoes

Pouring cream into mashed potatoes
Combining butter and cream in a small saucepan to heat (do not boil) before adding to your mash makes sure they are creamy and stay hot longer.

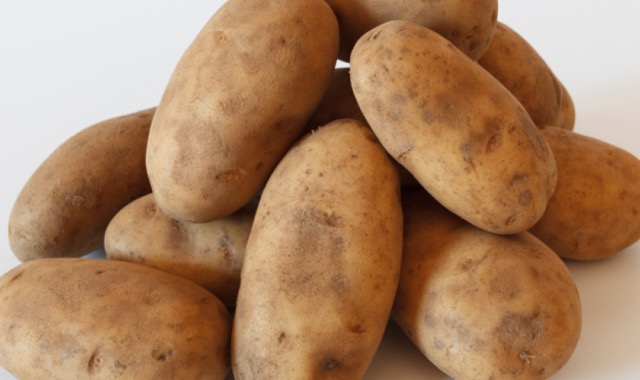
3. Use Russet Potatoes for Classic Mash

Russet Potatoes

4. For easy clean up, tear a brown paper bag in half, peel potatoes onto it, and roll up when done!
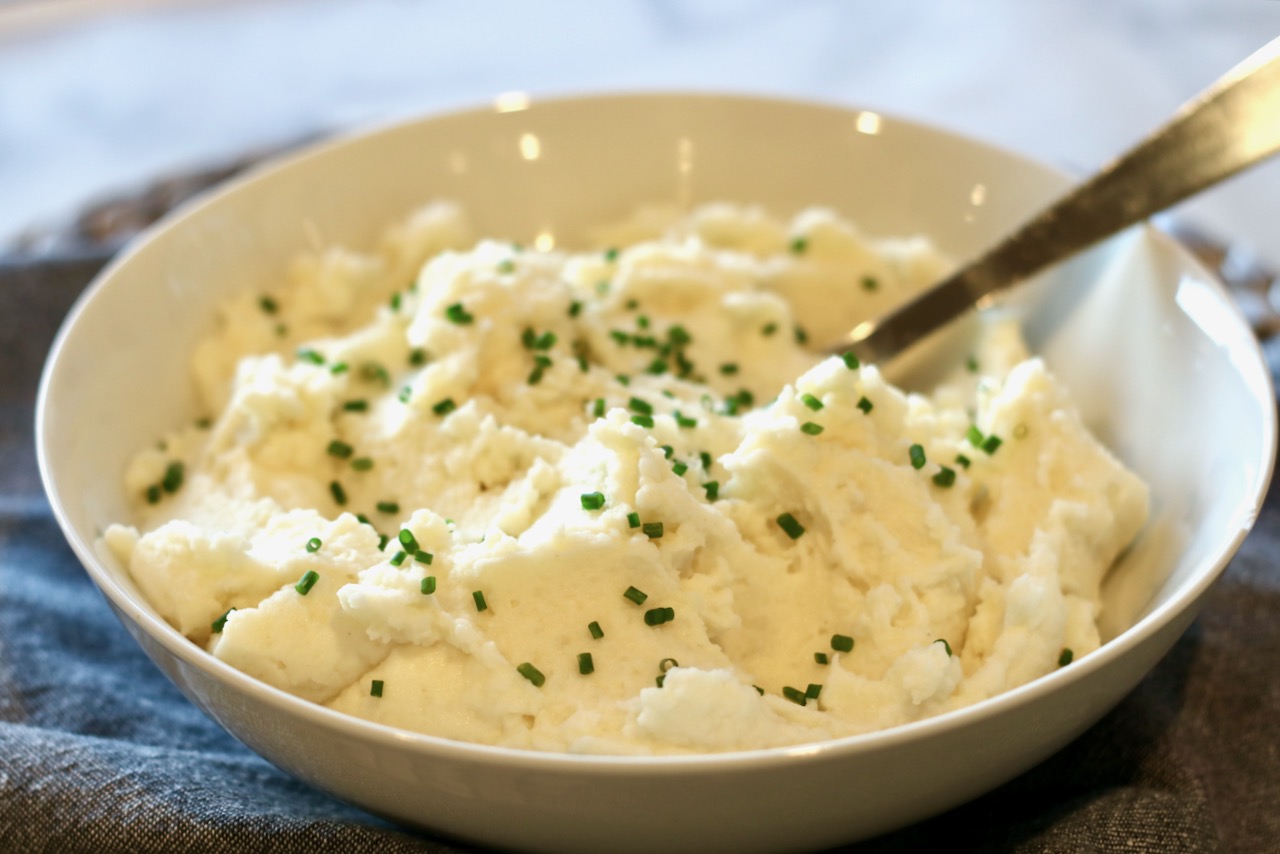
Make Ahead Gravy
Perfectly crafted gravy is the crowning touch to your holiday feast with unparalleled warmth and depth of flavor. Explore how to make gravy ahead to clear your stovetop and get maximum flavor.

Mashed Potatoes

The secret to great, fluffy mashed potatoes is using Russet Potatoes ,a potato ricer and warming your butter and cream together before adding them to the potatoes.
Prep Time20 minutes
Cook Time25 minutes
Total Time45 minutes
Course: Side Dish
Cuisine: American
Keyword: potato

Ingredients

  • 4-5 lbs russet potatoes
  • 1.5 cups half & half (organic if possible)
  • 6 tbs unsalted butter
  • 2 tsp kosher salt
  • 1 tsp white pepper Black pepper is fine, but white is preferred for appearance.

Instructions

  • Peel the potatoes, slice in half, and place into a large pot and cover completely with water. Bring to a boil. 
  • Lower the heat and simmer for about 25 minutes or until easily pierced with a knife. (Check at 15 minutes and then at 5 minute intervals.) 
  • Drain and mash the potatoes using a potato ricer. 
  • While mashing, heat the half-and-half and butter in a small saucepan over medium heat until the butter melts.
  • Slowly mix in the cream sauce, salt and pepper until well incorporated and creamy. Taste for seasoning. 

Notes

Try adding in parsley, chives or parmesan cheese to bring it up a notch. 
The amount of ingredients is something that is not a perfect science. Much depends on the type of potatoes you are using, how creamy you like your potatoes, how salty, etc. You need to add ingredients in slowly and taste several time to get it just how YOU like it! Remember, you can always put the salt (and butter) in but you can’t take it out! So be mindful. 

Love Potatoes? Check out these recipes!

Simply… Italian

Grilled Baby Octopus

[vc_row][vc_column][vc_custom_heading text=”Never loose sight of simplicity” font_container=”tag:h2|text_align:left|color:%23e69b10″ use_theme_fonts=”yes”][mk_dropcaps style=”fancy-style” background_color=”#727272″]I[/mk_dropcaps][vc_column_text css=”.vc_custom_1539656900715{margin-bottom: 0px !important;}”]recently returned from my first trip to my ancestor’s homeland, Italy. I wanted to go to Italy for many reasons but above all this, I wanted to experience the food. It was a truly incredible experience and I learned so much about history, culture and my heritage, but what I enjoyed the most was the small restaurants that opened a whole new appreciation for both cooking and eating with seasonal ingredients.[/vc_column_text][/vc_column][/vc_row][vc_row][vc_column width=”1/2″][vc_single_image image=”351″ img_size=”300×300″ style=”vc_box_rounded” onclick=”link_image”][/vc_column][vc_column width=”1/2″][vc_column_text css=”.vc_custom_1539657451037{margin-bottom: 0px !important;}”]Everything in Europe is so different than here in the U.S. but the food is truly a unique experience. Meals are created around fresh, seasonal ingredients not by what is on sale in the frozen food section. Although I am sure they exist, I could not even find a frozen department in any of the food markets I stopped into! The flavors are simple and beautiful and delicious. It was important for me to remember that sometimes the best meals come from the fewest, freshest ingredients.[/vc_column_text][/vc_column][/vc_row][vc_row][vc_column][mk_blockquote font_family=”none”]

To cook Italian means to… Cook with love. Cook simply. Cook fresh.

[/mk_blockquote][/vc_column][/vc_row][vc_row][vc_column][vc_column_text css=”.vc_custom_1539657472171{margin-bottom: 0px !important;}”]Since my return home, I have been cooking with that Italian approach of simplicity. The main ingredient, whether a meat protein or a vegetable, should shine in it’s purest form rather than be masked in other flavors. Usually all it takes to create a wonderful, beautiful Italian dish is some extra virgin olive oil, salt, pepper and a dash of an acid. It’s remarkably humbling to cook seemingly simple dishes because you must respect each ingredient to it’s fullest and cook it perfectly. In fact, there is nothing simple about cooking simply.[/vc_column_text][/vc_column][/vc_row][vc_row][vc_column][vc_single_image image=”350″ img_size=”full” alignment=”center” style=”vc_box_rounded”][/vc_column][/vc_row]

Risotto Cakes

Chive risotto cakes

One of the great indulgences in life is Risotto. But how about risotto cakes? You take one of the most wonderful foods and you can fry it….Mmm Mmm Good.

Risotto cakes are really easy to make. Make your favorite risotto recipe and chill it, form small patties, coat in panko bread crumbs and fry.

I am a big fan of Ina Garten’s Chive Risotto cakes. The recipe is really easy and everyone will think it took you hours of slaving over the stove!

The Recipe

Risotto Cakes

Prep Time10 minutes
Cook Time15 minutes
Total Time25 minutes
Course: Appetizer, Side Dish

Ingredients

  • 2 cups cooked and chilled Risotto (best if left overnight)
  • 1 cup panko flakes

Instructions

  • Spread the panko in a shallow dish.
  • Heat about 2 tablespoons of olive oil on med-high heat. 
  • Form patties out of the risotto and coat in the panko crumbs. 
  • Place the patties in the oil and cook for about 3 minutes on each side until the risotto cakes are crisp and golden. 
  • Drain on paper towel and serve hot. 

Tired of the standard BBQ fare?

Tired of the standard BBQ fare? Try our juicy grilled chicken skewers with bell peppers and onions, showcasing the appealing char marks from the grill.

[vc_row][vc_column][mk_dropcaps style=”fancy-style” background_color=”#727272″]S[/mk_dropcaps][vc_column_text css=”.vc_custom_1522976347818{margin-bottom: 0px !important;}”]ummer seems to have finally arrived and I for one, have welcomed it with open arms- and an grill!

BBQ’s are always the same old thing no matter the crowd – hot dogs, hamburgers, chips and pickles… perhaps an occasional potato salad. I am so bored with this! (Don’t lie- I know you are too.)  I’ve had enough with classic BBQ fare. BBQ’s can be so much more creative and delicious- there’s just no reason not to people! I know it’s an American tradition to grill up those processed dogs made from things you can’t even imagine so you choose not to think about it, and then throw them on a bun. But it doesn’t have to be this way!  I am determined to take take it up a notch this year. Take the BBQ challenge with me and ditch the dogs this summer and skewer up some shrimp!

A few ideas

  • BBQ sauce marinated chicken breasts
  • Grilled zucchini with garlic, chili pepper, evoo, salt & pepper
  • Grilled eggplant with balsamic drizzle
  • Grilled Portobellos with honey and Worcestershire
  • Grilled Asparagus with evoo, salt, pepper and lemon
  • BBQ shrimp kabobs
  • Teriyaki Marinated flank steak
  • BBQ basted salmon
  • grilled mahi mahi on a roll
  • Grilled tomatoes

[/vc_column_text][/vc_column][/vc_row]

Lasagna or Baked Ziti? The results are in.

Golden and bubbling homemade baked ziti garnished with fresh basil leaves in a glass baking dish, showcasing the delicious layers of pasta, cheese, and sauce.

Lasagna or Baked Ziti – Let’s discuss.

Lasagna and baked ziti are both popular Italian-American pasta dishes that are well known for their comforting flavors, hearty textures and ability to feed a crowd. While they share some similarities, there are distinct differences between the two that set them apart. Both are made with the same ingredients and yet they are so different posing the questions – how are they different and which one is best? Let’s discuss.

The simple difference between Lasagna and Baked Ziti

Baked ziti is tossed with an extruder style, dried pasta similar to a penne, and then tossed with marinara sauce, ricotta and mozzarella cheeses, and then baked in the oven. Lasagna is made by layering pasta sheets, often fresh pasta sheets, marinara sauce, ricotta cheese and mozzarella, and then baked. Both can include meat- sometimes ground, sometimes sausage.

Comparing pasta shapes

One of the most obvious differences between lasagna and baked ziti is the shape of the pasta used. Lasagna is typically made with flat, wide sheets of pasta noodles, while baked ziti uses a shorter, tube-shaped pasta, often resembling penne.

Layering Vs Tossing

While the ingredients are basically the same, the time commitment and the outcome are quite different.When making lasagna, you have to take the time to layer the ingredients being careful not to use too much sauce so it’s not soggy, and yet enough to not dry out the pasta sheets. You need to have patience spreading the layers of ingredients gently and evenly. Whereas baked ziti takes on more of a “toss it all together” approach and can therefore be assembled more quickly.  

Preparation of Lasagna vs Baked Ziti

Lasagna tends to be more time-consuming to prepare due to the layering process. Each layer must be assembled carefully to ensure even distribution of ingredients. Baked ziti is generally quicker to assemble since the pasta is simply mixed with the sauce and cheeses before being baked.

Lasagna’s effort results a wonderfully layered dish that ensures every bite is fairly consistent. It’s what I would make when I have time or for a special occasion. However, when it comes to feeding a crowd, this is where baked ziti has its time to shine!

Same Cheeses, different approach

While both lasagna and baked ziti include classic Italian melting cheeses, the way they are integrated into the dish is starkly different. Lasagna often incorporates ricotta cheese, along with mozzarella and sometimes parmesan into the layering process. Wheres, when making baked ziti, the cheese is tossed into the mixture and distributed evenly through mixing and then topped heavily before baking until golden brown and bubbly.

Variations

While both lasagna and baked ziti have traditional recipes, there are countless variations of each dish. Many are passed down from generation to generation in Italian-American households. And while the recipes out there can be great guidelines, these two classic dishes come out best when you make them your own and cook from the heart.

Lasagna may include meat such as ground beef, sausage, or even vegetables like spinach or mushrooms. Baked ziti can also be customized with different meats, vegetables, or sauces to suit individual preferences.

Whether you prefer the comforting layers of lasagna or the simplicity of baked ziti, both dishes offer a delicious taste of Italian-American cuisine. But the question remains…which do you prefer and why?

The results were a bit closer than I actually expected. 15 people said they prefer lasagna while 9 said they prefer backed ziti. If I count myself, the lasagna count would go up to 16. (Especially if I don’t have to make it!)

Here are some of the responses I received.

“ Lasagna. More versatility (meat, veggie, cheese) crispy top and gooey (not cheesy) bottom. Baked ziti is just baked ziti.”

“I prefer lasagna because I enjoy cutting into lasagna and getting every ingredient in one bite…and I’m a sucker for food with layers!”

“Lasagna without meat because you can really taste the cheese!”

“Lasagna. Nah- people ‘F’ up lasagna all the time. Baked Ziti”

“I like baked ziti better. Lasagna seems messy to me and I don’t really like meat lasagna which is how it most often comes (I find).”

“I prefer Lasagna because my nonna makes it with little meatballs!”

“I’m a lasagna girl. I love it for the layers and that u can put different ingredients in it.”

“I prefer baked ziti – easier to eat…lasagna always gets messy when people try to cut it…and i feel like baked ziti just tastes better – lasagna is always too soggy”

“Lasagna because of the structure. You can tell more care goes into creating the layers rather than just tossing it together.”

“Baked ziti- easier to eat.”

“Baked Ziti is boring. With Lasagna every spoonful is a surprise”

After receiving these comments, we can surmise that you really can’t go wrong with either. It comes down to time, skill level, and personal preference.

How to make the Best Lasagna

Like any meal that only contains a few ingredients, the better those ingredients are, the better it tastes. For those dedicated cooks out there who are ready to make lasagna (or raviolis) from scratch, try making your own pasta and your own ricotta cheese. And if you you have to choose between the two- make the cheese. Making ricotta cheese is incredibly easy and the results are outstanding.

Tip: When using fresh lasagna sheets, you do not need to boil them first which is a bonus!

The History of Lasagna

Did you know that the word “lasagne” or “lasagna” is actually traced back to Greece, not Italy? It is derived from the word “laganon”, which was the first form of pasta in the form of flat sheets of pasta dough. So how did become to be so widely known as a classic Italian dish around the world? If interested in the answer, check out this great article from Mi’talia Kitchen in Miami, Fl that has some fantastic and fascinating facts about lasagna.

The Port Chester Pizza Debate

Slices of pepperoni pizza, central to the Port Chester pizza debate, on a wooden surface with a focus on the melted cheese and pepperoni toppings.

Port Chester has a unique lock on one thing- pizza!

Not too long ago I was sitting at the now closed Greenwich Lobster House talking to some local PC friends and I posed the question, “Who makes the best pizza?” The debate got intense and lasted a solid hour and ended with no clear winner! I was a little disappointed because I truly wanted an answer! I thought it would help be clean out my take-out folder if I could decide whose pizza I liked the best. But I can’t. So the folder remains as full and active as ever!

For the title of ‘Best Port Chester Pizza,’ the toss up was between Frank’s Pizza, T&J, Frankie & Louie’s and Antonio’s. Many other pizzeria’s were discussed but only the above mentioned were considered ‘favorites.’

I can eat pizza all day, every day so I couldn’t be happier that I actually have the tough task of deciding where to order my pizza from every time I want it! I loved discussing this topic and found it interesting that other people also switch up their pizza place from time to time.

During the debate, some decisions were made that I thought would be fun to share!

Best overall food: T&J
Best Wedge: Tie between T&J and Frankie & Louie’s
Best specialty pizza: Franks
Best salads: Tie between Racanelli’s & Frank’s
Best house dressing: Tie between T&J and Racanelli’s
Best Calzone & Roll ups: Antonio’s

We did collectively decide on one thing- no one likes the chicken parm from Frank’s. The reason? They use thick chicken cutlets. I know most people probably wouldn’t care but this conversation took place amongst Italians and we Italians like our cutlets pounded thin! Sorry Frank’s.

Live Locally? What do you think?

Cake or Cupcakes?

A delicious-looking cupcake with vibrant blue frosting, sprinkled with pink and white edible beads.

Its a big week of Birthdays and it got me thinking…Cake or Cupcakes? Whats the preference?

Personally, I’m not a huge fan of either. When I was a kid, I distinctly remember this one birthday party held at the Roller Skating rink (why did that close anyway?) and they came around to give out cake and I said ‘no thank you. But can I have another slice of pizza?” I’m still like that! Brett heats up pie for dessert and I heat up mozzarella sticks!

Responses

I vote for mozz. Sticks too! But if I had to choose, I would choose cake. But not a typical cake. It needs to be something special like cannoli cake. Any cake that’s loaded with frosting is just not my thing and that is basically what a cupcake is. But I did drive by the pink cupcake bus the other day and some of the flavors did sound yummy like red velvet…..

Are 3 eyed fish the fish of our future?

I stopped eating farmed salmon years ago because of the high numbers of PCB’s, the excessive use of antibiotics in salmon farms and the the gross fact that farmed salmon meat would be grey without the use of an orange dye called Canthaxanthin, which has been linked to eye retinal problems. I could go on, but I won’t. Just trust me and always opt for wild caught, Alaskan salmon.

Like many other first time sushi goers, tuna was the first type of Sushi I tried and I fell in love with it. Then I learned about the mercury level in fresh tuna. Its so HIGH! The mercury levels change with the different types of tuna but no tuna is considered safe. Bigeye, or Ahi, is the tuna with the highest level of mercury. Guess which kind of tuna is the one most often used in sushi restaurants?

We caught a freezer’s worth of striped bass one summer and I spent 6 hours filleting and portioning the fish- I was so excited! I sat down to look up some recipes and discovered that SEVEN East Coast states issued advisories to limit eating striped bass and bluefish to 4 meals a year, and that women of child bearing years and children should avoid the fish altogether! Little did I know I had been filleting fish flavored with Polychlorinated Biphenyl.

And Shrimp- let me simply quote a caption from the book, Bottomfeeder: How to Eat Ethically in a World of Vanishing Seafood, where author Taras Grescoe describes the process of shrimp farming. “The shrimp pond preparation begins with urea, superphosphate, and diesel, then progresses to the use of piscicides (fish-killing chemicals like chlorine and rotenone), pesticides and antibiotics (including some that are banned in the U.S.), and ends by treating the shrimp with sodium tripolyphosphate (a suspected neurotoxicant), Borax, and occasionally caustic soda.” So dwell on that for a while next time you enjoy your shrimp cocktail.

All this is bad enough- But radioactive waste in the ocean? Now this is an entirely new ball game. My heart actually hurts to know Japan is pumping radioactive waste into the ocean. How can this not impact the fish? Asia is the leading producer of fish for the world market and places as far and wide as India and the US have banned imports from Japan because of the impact on the food supply from the nuclear disaster at Fukushima. No one seems to have any idea about the long term effects on the Pacific and its eco system and if that nuclear waste will find its way to our shores. But I do know this- I don’t think I’ll be ordering up that Big Eyed Tuna sashimi any time soon- or ever again. I have a feeling that dying our salmon is soon to be the least of our concerns.

To Flour or Not to Flour? THAT is my question!

A bowl of white flour with two whole eggs placed on a surface dusted to flour.

When making cutlets of any kind, I have always floured, egged, breadcrumbed. After watching my friend, who is an excellent cook, make cutlets without the flour step, I started asking around and it seems the jury is split. Some people use flour and some skip flour.

I can’t seem to taste enough of a difference stay committed to my way, but it is hard for me to break tradition without some reasoning behind it. Its so much easier to skip the flour and soak all the cutlets in egg so you don’t need to dip, dip, dip individually.

So I logged into a cooking forum and I asked, “Does anyone know the actual purpose of flouring cutlets before putting them in the egg?”

The responses ranged but were all very good and thoughtful.

The consensus seems to be that the flour provides something for the egg to stick to (a problem I did not encounter) and without it the breadcrumbs have a tendency to separate from the meat when cooking or cooked (This did in fact happen during testing) But that if you really wanted to skip the step then to make sure you let the cutlets soak in the egg for 15-20 minutes. (I did do this so that makes sense why the breadcrumbs stuck during dipping)

So there I have it. Its optional but there is a reason to flour. But in a rush, it can be done with out the flour, but you have to be a bit more gentle with the meat.

White beans and dreams

White beans with shrimp, brussel sprouts and bacon in a bowl

When I first got married, I didn’t have much experince in the kitchen outside the Italian-American household I grew up in. So when I cooked, I tended to cook what I knew how to make. This meant lots of meatballs, and lots of pasta! One day my new hubster said to me, “You know babe, I would really love to eat something other than pasta.” I felt like I was punched in the gut! Who doesn’t like macaroni and ‘gravy?’ That’s when I realized that I really didn’t know how to cook.

I threw myself into reading recipe books and started to really experiment in the kitchen. In retrospect, that confession by Brett is what led me to discover my passion for being in the kitchen.

Long after I learned how to do more as a cook than cover everyone in gravy, (that’s red sauce to the rest of you) there was this one night when I really wanted my macaroni fix.  So I decided to try a new recipe and decided on Michael Chiarello’s Tuscan Cannelloni Beans. As I was cooking, I realized I preparing a sauce that would go very well over a pasta.  Inspired by this, I started using cannellini beans in place of pasta for many of my favorite sauces.

The great thing about working with these beans is their soft, subtle texture adds a natural creaminess to a dish and also acts as a natural thickner. Cannellinis absorb flavors very well, especially complimenting garlic, tomatoes, wines and broths.

I’ve really come to enjoy making a great bean dish and it’s all thanks to learning how to step out of my culinary comfort zone. Making connections in the kitchen is always exciting, and the learning never stops. It’s what I love most about cooking.

Any given bean day…

Cold Food Can Be More Than Cold Cuts

Gourmet flatbread topped with shredded cheese, herbs, and a mix of finely chopped vegetables and meats, served cold on an elegant white platter.

When I have guests over or need to bring a dish to party, there are about a zillion reasons why I try to focus on cold cuisine. I think the mistake many people make is thinking that cold cuisine means a cold cut platter. And please don’t misunderstand, I love my Boar’s Head Deli meats! But sometimes you need to kick it up a notch a be a bit more fancy. I obviously enjoy cooking and truly enjoy eating hot food, but sometimes I just think cold, or room temperature food, is wiser choice. Here’s why….In case you’re interested in my reasoning!

When you bring hot food to a party and you don’t know what the host may have in their oven, you could throw a real monkey wrench into their food plans by taking up a shelf in their oven. It’s been done to me and I’ve done it to others!

Hot food gets cold- Quick! So the time to share it with guests is limited and then it just goes to waste unless you have a way to keep it warm. Not likely. And lets face it, not all food works well in a steam tray so its not always a solution. (Has any ever really had a crispy buffalo wing out of a steam tray…(Sigh) another pet peeve for another day!)

Another great benefit of serving cold food is that it can be prepared and plated ahead of time with ease, which means less stress during the party.

And the #1 reason for avoiding hot foods during a party is that you don’t need to be in the kitchen while you’re guests are in the living room! I aim to not have much cooking to do when guests are over. Everything can be set up for when guests arrive or simply taken out of the fridge, already plattered and its done! Now everyone, including the host, can enjoy the event.

Some of my Favorite Cold Cuisines Dishes

  • Tomato & Mozzarella platter
  • Pasta Salads
  • Tomato Salald
  • Shrimp Cocktail
  • Tea Sandwiches
  • Assorted Bruschetta
  • Smoked Salmon
  • Ham & Swiss Sliders
  • Antipasti Kabobs

Rockin’ Root Beer Pulled Pork

Pulled pork

A Fun & Fabulous Way to Make Pulled Pork

My sister doesn’t cook as often as I do so when she said she had a recipe I should try, I knew it must be both easy and delicious, so it was time to get cooking. I made it once, and I was hooked! It is now one of my most popular recipes amongst my friends and feasters, and puts a smile on my guests faces every time!

The best thing about this recipe is you only need three basic ingredients- pork shoulder, root beer and your favorite BBQ sauce. When it comes to BBQ sauce, I like to keep it simple and classic with Sweet Baby Ray’s original BBQ sauce! But BBQ is a matter of preference and whether you make your own, prefer Carolina style or Texas inspired, you really can’t go wrong.

I highly recommend you plan to keep busy outside your house while this is cooking because I promise you- the smell is simply tantalizing after just a few hours!

When I have planned far enough in advance, I typically whip up a spice rub of brown sugar, ancho chili powder, kosher salt, fresh cracked pepper, garlic powder, onion powder, thyme and a pinch of cayenne. You can use any pre-made rub but I just make my own.  I put the rub on, wrap it tightly in plastic wrap and let it sit for up to 24 hours. (Be sure to put it on a plate or in a pan because it could get messy and leak once the rub starts to break down and do its thing.)

Feaster’s Tip:

Over the years, I have served this up a few ways, but my feasters (AKA neighbors & friends!) all agree, on potato rolls with tangy coleslaw is the way to go.

The Recipe

Pulled Pork

Cook Time6 hours
Course: entree
Cuisine: American
Keyword: pork
Author: Christina Collins

Ingredients

  • any size pork shoulder (be sure it will fit in your crock pot!)
  • 1-2 cans root beer
  • 4 tbsp homemade or your favorite bbq dry spice rub (optional but recommended)
  • 1 bottle of your favorite bbq sauce (I like Sweet Baby Rays original bbq sauce)
  • Potato buns optional if making sandwiches.

Instructions

  • If using a dry rub, rub meat all over, Wrap in plastic. Place onto a sheet pan (to catch leaks!) and place into refrigerator overnight. 
  • Uncover and discard plastic wrap and place the meat into the slow cooker. 
  • Pour enough root beer into the slow cooker until the meat is just covered. Turn onto low and cook for 6-8 hours or until meat shreds easily with a fork. 
  • Drain the root beer. Discard the bones and excess fat. Shred the meat and return to the slow cooker. 
  • Gently fold in just enough BBQ sauce to lightly coat the meat. Server immediately or keep on the warm setting for up to an hour. 
  • Serve with buns, coleslaw and extra bbq sauce on the side.